Thursday, July 28, 2011

Glimmer Mist experiment

So, I see everyone using Glimmer Mist or products like it and decide I should try it out. I had this embossed piece of cardstock lying around and it was my first victim. First though I diecut a butterfly and temporarily adhered it to my piece of cardstock so that it would creative a negative impression.

2011 06 28_3894_edited-1

I found a couple other extra die cuts in my bin and stuck them on the front of the card. A little PP and sewing and it's done. I'm not entirely happy with it but it was a good first experiment with Glimmer Mist.

Supplies:
Stamps: Favor It Baby
Other: Viva Pink Glimmer Mist

Sunday, July 24, 2011

Baby cards

2011 06 29_3882_edited-1

I made several quick baby cards all following this same pattern - just different colors. After I put the text paper down on this first card (the "pink" one) I realized that I adhered it too high and it looked a little off balance. It should have been placed a bit lower but pulling it off would have made a mess and it wasn't that bad so I just left it.

2011 06 29_3883_edited-1

Nonetheless, when I made my next card, I adhered that book text strip a little lower on the card to hit the "rule of thirds" line.

Here's the yellow one for when you just don't know yet what the little bambino is going to be - boy or girl.

2011 06 29_3884_edited-1

And all three together. So quick and simple and now I have three baby cards just waiting to be used.
2011 06 29_3885_edited-1

Supplies:
Stamps: Outline Alphabet (PTI)
Paper: White and Rustic Cream (PTI)
Other: buttons (PTI), ribbons, text paper from an old  book

Have a terrific week!

Friday, July 15, 2011

Graduation card

This design I copied from Melissa Phillips (I think). It was in a recent issue of Paper Crafts magazine. Like the last few cards I've made I've pushed myself to use up some of my scraps. My DH's niece was graduating from college and the school colors were purple and gold so that's why I went with these colors.

2011 06 28_3892_edited-1

I punched out the star from a piece of purple cardstock, covered it with glue, and then with glitter. It's quite sparkly!

Hope you like it! :)

Supplies:
Stamps: For The Graduate (PTI)
Paper: Vintage Cream (PTI), patterned paper is from my stash
Other: star punch (EK Success), buttons (from my stash), embroidery floss

Monday, July 11, 2011

Make A Wish

I had this die cut (from MME?) sitting around and just started playing with it, pulling things out and putting things together. I did a little rock-and-roll technique with the dandelion-looking flower. Then I remembered the "Make A Wish" sentiment from the Cupcake Collection and thought it was a perfect match for the dandelion. Don't you think so?

2011 06 28_3890_edited-1

I used a bit of twine to make a little x on each side of the die cut. It just seemed to call out for something and buttons didn't look quite right. I like the bit of rustic twine.

I used an edge die from Tim Holtz on the front of the card. I put a bit of patterned paper on the inside flap so the edge would stand out a bit more. It doesn't stand up very well like this so I'm holding it so you can kind of see a little better how it looks.

2011 06 28_3891_edited-1

We're on vacation this week in St. Louis but I scheduled this post so you'd have something to look at while I'm gone. I'm going to see if I can't get one more scheduled to go. Have a fantastic week!

Supplies:
Stamps: Botanical Silhouettes, Cupcake Collection (PTI)
Paper: Vintage Cream, patterned paper (MME)
Other: twine (PTI), die cut (MME), ribbon (PTI), edge die (Tim Holtz)

Friday, July 8, 2011

Birthday Ticket

This idea popped into my head the other day so I thought I better put it to paper. It actually turned out pretty close to how I saw it in my head. That doesn't always happen.

2011 06 28_3895_edited-1

I die cut some tickets from various colors of cardstock and then die cut the word "happy". The black line was hand drawn around the edge of the card. After it was all assembled I thought it needed a little something more so I added the Stickles to the letters and to the big star. It seemed to give it that little "oomph" that it needed.


Here's a close-up of the tickets...

2011 06 28_3896_edited-1

Change up the color scheme and the word on the tickets ("baby", "girl", "boy", "love"...) and you could make a variety of cards with this design.

Supplies:
Stamps: Just the Ticket; Outline Alpha, Star Prints, All Star Team (all PTI)
Paper: Smokey Shadow, White, Simply Chartreuse, Orange Zest, Hawaiian Shores, Raspberry Fizz (all PTI)
Patterned paper: from my stash
Other: Just the Ticket die, Wonderful Words die (all PTI); Stickles; star punch, American Crafts black pen

Tuesday, July 5, 2011

Card of scraps

Every single piece of this card was a scrap. A leftover. An extra. I have a bucket where I put extra die cuts and I noticed the blue polka dot star on top of the green label and I liked it. I thought I could work it into a baby card. And then I remembered that I had a card with embossed baby feet on it. That thing is so old (easily 10 years!) I don't even remember what brand it is. Then I saw the cork star. And then the ribbon piece. The blue ribbon doesn't quite match but you know what? It was a scrap and by gum I was going to use it. That was the deal with this card - use up some of my crap stuff.

2011 06 28_3888_edited-1

Thanks for stopping by today! :)

Supplies:
Stamps: Inside and Out: Baby (PTI)
Paper: white embossed paper is from my stash; Spring Moss (PTI)
Ink: Creamy Brown (Clearsnap)
Other: cork; ribbon, button, twine, nestability die (Spellbinders), star die (SU!)

Friday, July 1, 2011

You Rock

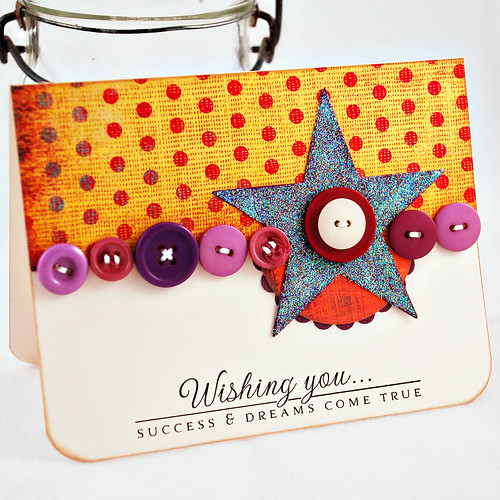
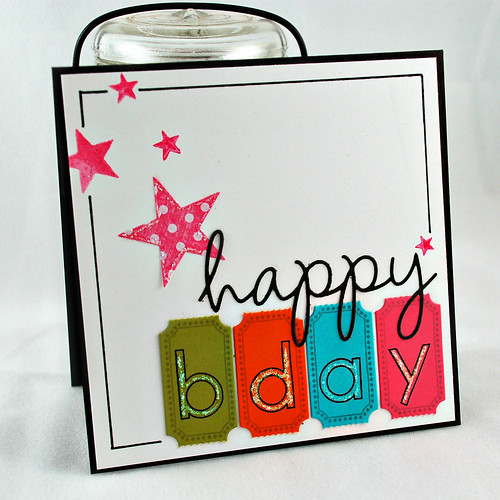
I'm in love with this card. Sorry. I just am. Is that okay to say about my own stuff? I love all the white, I love the texture, I love the stars, I love the colors.

2011 06 26_3901_edited-1

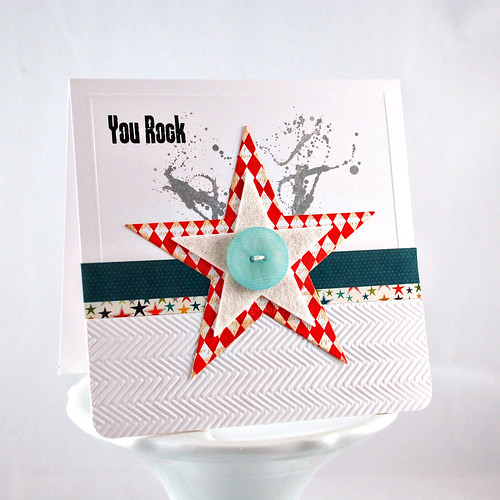
This one started out as a "mojo starter." I wanted to make something but I needed something to get me going. I grabbed my A Little Argyle stamp set and Pure Poppy ink and started covering a piece of white cardstock. Wow, talk about making your eyes cross. All that red argyle against white paper. Stunning, but a little less please. So, I went back over the argyle with Text Style and Antique Linen ink. It softened it just right. Then I decided to cut stars out of the background pattern I just made. Then the card just spiraled from there, my "mojo starter" did just what I wanted it to - it led me right into this card.

It's going to be hard giving this one away. Do you ever get that way about some of your cards? This one is going to have to be saved for someone very special. *wink*

Supplies:
Stamps: A Little Argyle, Text Style, Grunge Me (all PTI)
Ink: Pure Poppy (PTI), Antique Linen (Ranger)
PP: Lime Twist (MME)
Other: button, felt, dies (all PTI), corner rounder, texture folder (Cuttlebug/Provo Craft), Scor-Pal for the scored border